 Last year, 2012, I was made aware by an email sent to the San Francisco Randonnuers (SFR) mailing list of a Kickstarter project involving a new bicycle light concept. Using eddy-current a guy in Germany had figured out how to harvest energy from the moving wheels of a bicycle and deliver enough light for riding at normal speeds, not just light to be seen but light to ride with. Cool! I love new ideas and if I can help an individual more points!. Many randonneurs took a skeptical stand. To some degree, randonneurs are usually divided in two camps, the retro/grouches that don't want/consider change and stick to tradition and the ones who are very much into gadgets, doodah and such. I think I fall somewhere in between. I am pragmatic, If I like the function, aesthetic and after doing my research I come to the conclusion it would work for me and I can afford it, I'll adopt it. I went and read and watch videos and made up my mind. I would order the Magnic Light, a set of two front lights, $250.
As the project evolved the developer figured a way to make the light smaller and more efficient keeping the same cost. At the end he offered to deliver double on his original concept. Instead of two front lights, I would get two front and two rear lights, double cool.
The developer keep sending updates and finally about 7 months after they were promised I received my two front lights and two rear lights. The SFR 600 km brevet from San Francisco to Fort Bragg and back was in 5 days the perfect opportunity for a real test.
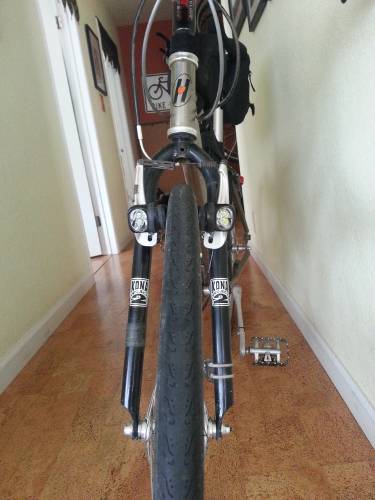
Except for the translucent unit housing, both front and rear lights look the same. My primary use for these lights will be for Brevets and the occasional night ride. There are two versions of the lights a Sport and a City version, the difference being the speed at which they start producing light. The City version lights up earlier but the Sport produces more light at faster speeds. I bought extra mounting brackets to use the lights on other bikes so I may end up using them a lot more than what I anticipate since removing and putting back the light on the bike is a matter of seconds, but I am getting ahead of myself.
- Each Magnic Light unit without the mounting brackets is about 50mm x 50mm x 35mm.
- The "Sport" version of the light unit weights 58 gms.
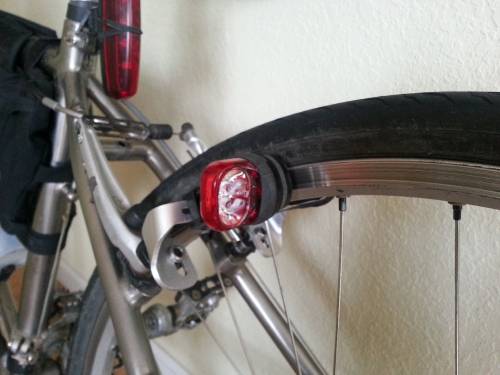
- A complete mounting bracket (for cantilever brake mounting) 18 gms he also offers adapters for caliper brake equipped bikes and for bikes with disk brakes.
- The complete light mounted on the bike weighs 76 gms. So two of them are just 152 gms.
- The carying plastic case for storing/transporting the light is 16 gms.
For comparison, my Dinotte 200 L with battery mounting pouch and 4 AA rechargeable NiMh batteries weighs 210 gms, with battery mounting pouch and 4 AA Lithium batteries 155 gms. The Dinnote light is a cilinder of ~65mm x 28mm.
 Mounting the lights on the bike is simple but requires a bit of trial and error to get them positioned and aimed perfectly. I installed them one evening and then readjust over the course of a couple of evenings until I was happy. I had to bend the included Cantilever brackets a few millimeters to help me position the front lights where I wanted them; the rear lights use exactly the same bracket and did not need any bending, they just went on and stay there.
The light unit themselves have 3 adjustments. One vertical that is set with a small screw on the back of the unit and moves the unit up/down to help achieve optimum rim/light height. A second left/right adjustment to get parallel alignment between the light and rim. A last adjustment to aim the light beam up/down. There is no provision to adjust the light beam left/right and that is the reason I had to bend (a few millimeters) the aluminum Cantilever stud mounting bracket. Well the second adjustment I described provides some degree of left right adjustment but is not intended for that purpose as the unit and the rim are supposed to be parallel to each other and if you move the unit to either side then that alignment is lost.
The light brackets have a quick release that is very easy to use and leaves just the aluminum bracket and plastic click interface on the bike. It literally takes a couple of seconds to remove the light from the bike and there are special plastic cases to store and transport them. With the supper dupper strong magnets used, the storing cases make sense to protect other electronic gadgets you may carry in the same bag from the light magnets. A must if you carry a cell phone and a light in a small seat bag.
Not that the lights need it, but as I do with all lights and taillights, I wrapped a rubber band made out of and old inner tube around the light and bracket to prevent any flying-light surprises on the road.
 After the lights were installed I did spin the wheels and there was definitely no drag whatsoever, none. The wheels spin as freely as they did before the lights were installed. I thought the current/force or whatever that is called, created by the lights would generate some drag but that was not the case.
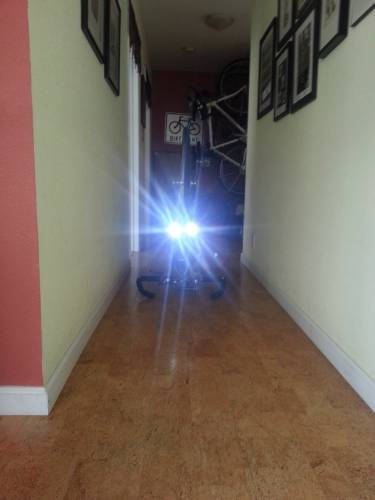
Once I started moving at a very low speed the lights start working and get brighter as speed increases. It seems they reach maximum brightness at ~22-25mph and shut down completely at about 5mph.
Compared to my trusted Dinnote 200 L (the 4 AA version) on "medium" setting, the 2 Magnic Lights installed on the front are as bright. I can descend at full speed (25+mph the same roads I descended at full speed with my Dinnote set on "high". At an average speed of 12-14mph the lights generate enough output for my eyes to feel safe while riding unfamiliar roads. At 20mph they are definitely more than adequate. Going up steep roads the lights flicker just a little at about 5mph but since at that speed I need more to bee seen than see and I always have the helmet light on, I am ok. A little trade off that I can live with.
The beam is wide and projects about 10-15 yards ahead, depending on how you aim the lights of course. I always complement bicycle mounted lights with a helmet light that allows me to aim around turns and read signs. The helmet light is also great to aim at drivers on crossing traffic and let them know you are there.
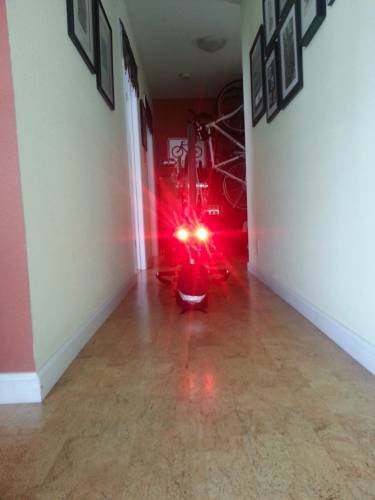
Now for the rear. I have been using the Cateye taillight LD600 and LD610 for years and always have had positive feedback from other riders regarding their brightness. The Cateye uses 2 AA batteries I use NiMh rechargeable and sometimes lithium disposable batteries. They are freakingly bright with the lithium disposables and very bright with rechargeables. The rear Magnic Lights are brighter than those Cateye taillights (with lithium batteries) I have to make sure to aim them correctly not to blind traffic and riders behind me.
I think a single rear Magnic Light is more than enough. On the other hand, depending on your night vision, a single front Magnic light may or may not do it for you. I think I can get around with a single front Magnic Light but for brevets is always a good idea to have a backup (the extra front light Magnic Light) and a "plan C" (the helmet light.)
Now for the SFR May 11, 2013 600km test. Unfortunately my camera died in the first hour of the whole ride so I have no photos of the light in action, however there were other riders with cameras so perhaps I will find some photos soon. I usually don't sleep during this event an it takes me on average ~32 hrs. The lights were installed for the whole duration of the ride including the extra 5 miles to and from the start. At the end I completed the route in ~33:30 hours plus 20 minutes each way to/from the start makes it 34:10 hours. Moving time, thus working time for the lights, was about 28:30 (including the trip from and to home) Here is the route as per my GPS in case you are curious.
 At night I first was riding with a rider who uses a Dynohub powering a single LED light. At 10-13 mph his light was brighter and the throw was further but as speed increased the pair of Magnic Lights started to match the brightness of the other light and at speeds over 26mph the Magnic Lights seemed brighter to me. I don't think any other rear light I saw during the ride matched the brightness of the rear pair of Magnic Lights, they are very bright, at least from me looking backwards. After the ride, comments from other riders who saw me where that the rear and the front lights where very visible during the day, I rode with others for a few hours of the night, comments from those riders were also positive. Keep in mind randonneurs are very picky about lights.
I had no issues with the lights it seems they will be very reliable. The mounting brackets stayed in place and the lights maintained their alignment.
At the end I am very satisfied with the Magnic Lights.
There are other lights that are brighter, stay on when the bicycle stops moving and are not affected by wheel speed but may require to carry batteries or create significant drag.
No moving parts, no drag and more than adequate brightness for my eyes; only time will determine reliability but if the 600k 30+ hours of use are an indication i have not much to worry about. The construction is very well though out, I am surprised a single guy pulled this one out and delivered such a great first generation product. Just to show larger companies can and will be challenged with technology and forward thinking. I think this is truly the most revolutionary thing happening to vehicle lights in a long time. Disruptive technology that has the potential to change the way we see, pun intended.
The Magnic Light manual/instructions can be found at: http://www.magniclight.com/MagnicLight/manual.pdf
(First posted May-14-2013 at 02:40 pm)
No related pages or links.